> ## Documentation Index
> Fetch the complete documentation index at: https://docs.wpos.ai/llms.txt
> Use this file to discover all available pages before exploring further.
# Assign sites
> Decide which client sites each member works on, and give each of them their own WordPress login on those sites.
Members only see the sites you assign them. Assigning a site does two things
at once: it puts the site in the member's site list, and it gives them a
WordPress login of their own on that site. Every person's work on a client
site then runs under their own WordPress account, not a shared one.
## Who sees what
* **The owner** sees every site and sandbox in the workspace.
* **Agency Managers and Operators** see the sites assigned to them, plus any
sandboxes they created themselves.
Until something is assigned, a new member's dashboard says **No sites assigned
yet** and tells them who decides which sites they work on. The owner assigns
sites to anyone; an Agency Manager assigns sites to their own operators, and
only sites the manager has been assigned themselves.
## Assign sites to a member
1. On the [Members](/agencies/members) page, click the **Assign sites** icon on
the member's row.
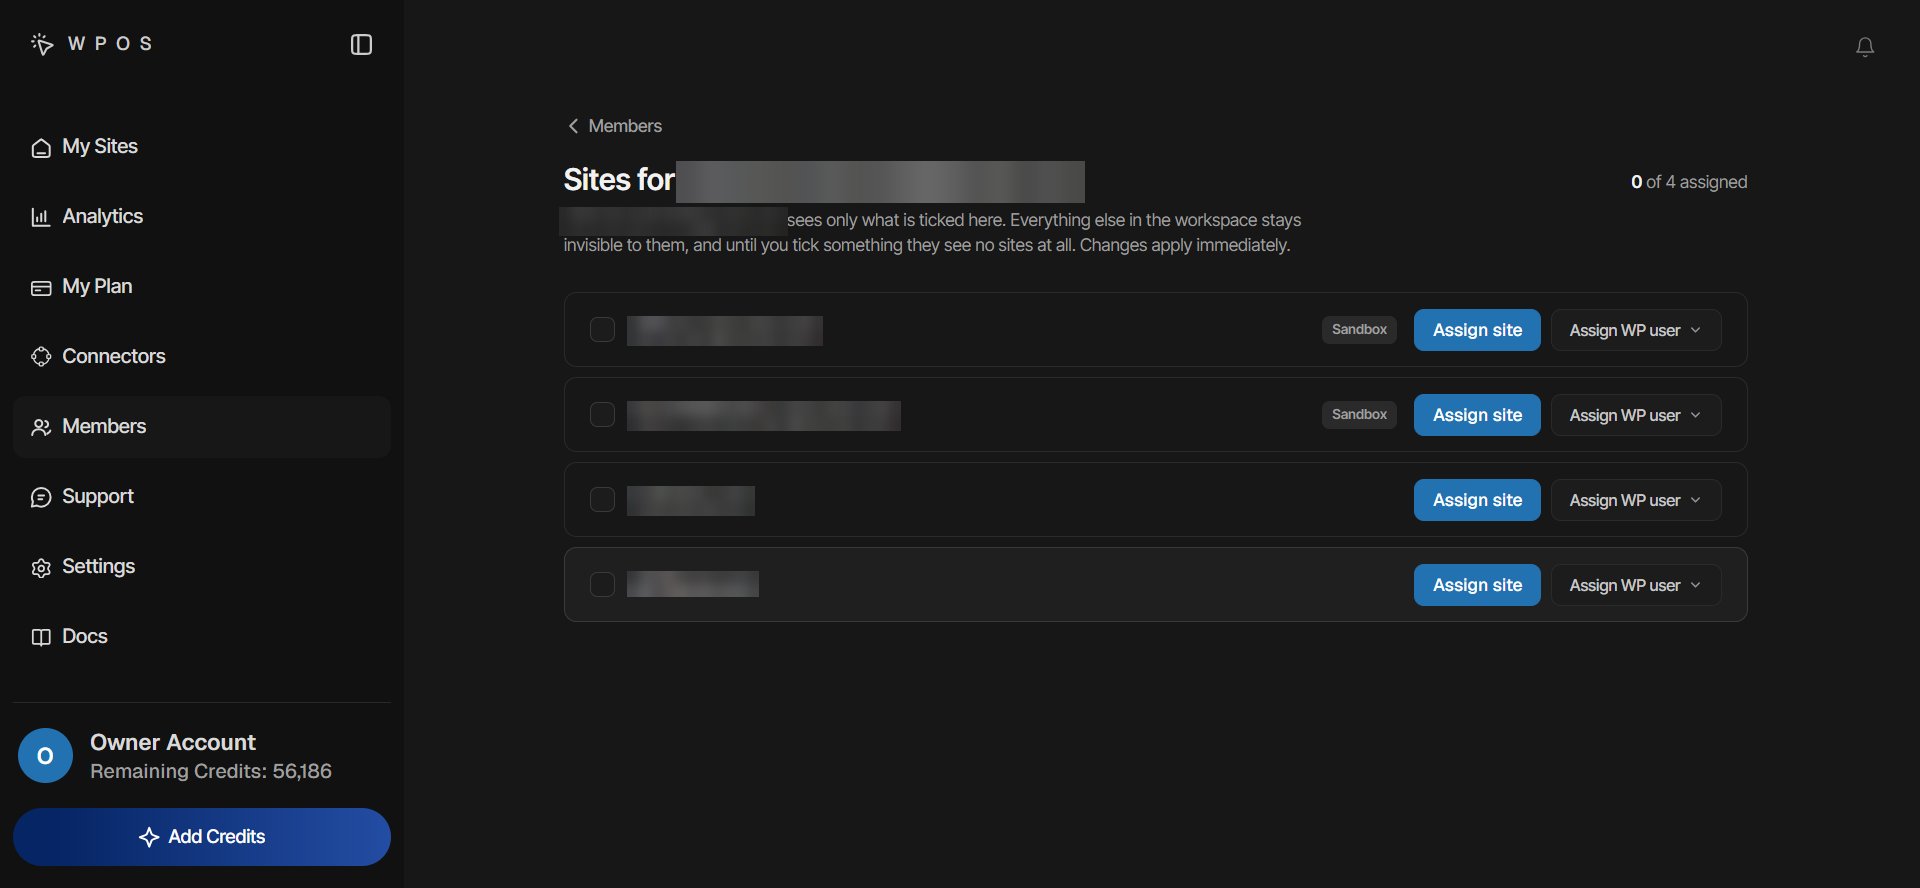
2. The **Sites for** page lists every site you can assign, with sandboxes
tagged **Sandbox**. A search box appears when the list is long.
3. Click **Assign site** next to each site they should work on, and choose
their WordPress login (see below). Click **Unassign** to take a site away.
Changes apply immediately; there is no Save button.
 ## Assign a site to people
To work from the site's side instead, open the site's three-dot menu on the
dashboard and choose **Assign site**. The page lists everyone in the workspace
who can be put on that site, with **Everyone**, **Managers**, and
**Operators** tabs and a search box. People already on the site are marked
**On this site**. Use **Assign site** and **Unassign** the same way.
## Choose their WordPress login
Assigning a site needs a WordPress login to go with it. When you click
**Assign site** and the member has no login on that site yet, the **WordPress
users** panel opens and asks you to select one. You can give them an account
that already exists, or create a new one.
Tick the account in the list. A dialog asks what to do about its
password:
* **Keep the current one**, when the member already holds this account.
* **Set a new one**, to give the account a new password.
* **I already know it**, when you will pass on the password yourself.
Click **Assign login**.
Click **Create new user**. The **Create an account for** dialog asks for a
**Username** and **Email** (filled in with the member's address), an
optional first and last name, a **Password** (type one or click
**Generate**), and a **Role**.
**Give this account to** the member and **Email the new user about their
account** are both ticked by default. Click **Add user**.
Roles offered are Subscriber (the default), Contributor, Author, Editor,
and Administrator. Only the workspace owner can create an Administrator.
Once the login is chosen, the site is assigned and a confirmation names the
site and the member. Each member holds one WordPress account per site, and
each account belongs to one member at a time.
Creating WordPress accounts needs the **Create WordPress users** permission,
which only the owner has by default and which cannot be given to operators.
Giving someone an account that already exists does not need it.
## Manage the WordPress users on a site
The **WordPress users** panel lists the site's accounts, ten to a page, and
shows who holds each one. From it you can:
* **Set a password.** The new password is shown once, with a copy button.
Only the owner can set the password on a WordPress Administrator.
* **Release an account.** **Release account** takes the login back from the
member. If WPOS set its password, the password is changed as part of the
release. If you entered it under **I already know it**, it is left as it
is.
* **Remove a user.** Choose whether their content is deleted with them or
moved to another user. WordPress does not allow the primary administrator to
be removed, and an account someone holds has to be released first.
## Unassigning a site
**Unassign** takes the site off the member and frees their WordPress account
so it can be given to someone else.
* If WPOS set the account's password, it is changed, so the old one no longer
signs in.
* If WPOS did not set it, it is not changed. They can still sign in until you
change it in wp-admin.
* If the site cannot be reached, WPOS says the password could not be changed.
Reset it on the site to lock them out.
Disabling a member unassigns all of their sites. See
[Members](/agencies/members).
## What the member sees
A member's site list shows only their assigned sites and their own sandboxes.
The key icon on a site's row, **Show login credential**, opens their WordPress
login for that site: the login URL, their username, and their password behind
**Reveal password**, each with a copy button.
### Member license keys
In **Settings**, a member sees **Your license key** instead of the account's
key. It works only on the sites they are assigned ("Works on the N sites you
are assigned"), and credits spent with it come out of their own budget. Before
anything is assigned, it says the key will start working once they get a site.
Roles, teams, credit budgets, and managing each member.
Bring agency managers and operators into the workspace.
## Assign a site to people
To work from the site's side instead, open the site's three-dot menu on the
dashboard and choose **Assign site**. The page lists everyone in the workspace
who can be put on that site, with **Everyone**, **Managers**, and
**Operators** tabs and a search box. People already on the site are marked
**On this site**. Use **Assign site** and **Unassign** the same way.
## Choose their WordPress login
Assigning a site needs a WordPress login to go with it. When you click
**Assign site** and the member has no login on that site yet, the **WordPress
users** panel opens and asks you to select one. You can give them an account
that already exists, or create a new one.
Tick the account in the list. A dialog asks what to do about its
password:
* **Keep the current one**, when the member already holds this account.
* **Set a new one**, to give the account a new password.
* **I already know it**, when you will pass on the password yourself.
Click **Assign login**.
Click **Create new user**. The **Create an account for** dialog asks for a
**Username** and **Email** (filled in with the member's address), an
optional first and last name, a **Password** (type one or click
**Generate**), and a **Role**.
**Give this account to** the member and **Email the new user about their
account** are both ticked by default. Click **Add user**.
Roles offered are Subscriber (the default), Contributor, Author, Editor,
and Administrator. Only the workspace owner can create an Administrator.
Once the login is chosen, the site is assigned and a confirmation names the
site and the member. Each member holds one WordPress account per site, and
each account belongs to one member at a time.
Creating WordPress accounts needs the **Create WordPress users** permission,
which only the owner has by default and which cannot be given to operators.
Giving someone an account that already exists does not need it.
## Manage the WordPress users on a site
The **WordPress users** panel lists the site's accounts, ten to a page, and
shows who holds each one. From it you can:
* **Set a password.** The new password is shown once, with a copy button.
Only the owner can set the password on a WordPress Administrator.
* **Release an account.** **Release account** takes the login back from the
member. If WPOS set its password, the password is changed as part of the
release. If you entered it under **I already know it**, it is left as it
is.
* **Remove a user.** Choose whether their content is deleted with them or
moved to another user. WordPress does not allow the primary administrator to
be removed, and an account someone holds has to be released first.
## Unassigning a site
**Unassign** takes the site off the member and frees their WordPress account
so it can be given to someone else.
* If WPOS set the account's password, it is changed, so the old one no longer
signs in.
* If WPOS did not set it, it is not changed. They can still sign in until you
change it in wp-admin.
* If the site cannot be reached, WPOS says the password could not be changed.
Reset it on the site to lock them out.
Disabling a member unassigns all of their sites. See
[Members](/agencies/members).
## What the member sees
A member's site list shows only their assigned sites and their own sandboxes.
The key icon on a site's row, **Show login credential**, opens their WordPress
login for that site: the login URL, their username, and their password behind
**Reveal password**, each with a copy button.
### Member license keys
In **Settings**, a member sees **Your license key** instead of the account's
key. It works only on the sites they are assigned ("Works on the N sites you
are assigned"), and credits spent with it come out of their own budget. Before
anything is assigned, it says the key will start working once they get a site.
Roles, teams, credit budgets, and managing each member.
Bring agency managers and operators into the workspace.