> ## Documentation Index
> Fetch the complete documentation index at: https://docs.wpos.ai/llms.txt
> Use this file to discover all available pages before exploring further.
# Select and edit
> Click any element in the live preview, describe the change, and WPOS edits it at the source: the widget and style rule behind it.
export const YouTubeVideo = ({id, title, caption}) => {
const [playing, setPlaying] = useState(false);
return
{playing ? : }
{caption ?
{caption}
: null}
;
};
The fastest way to change something on a page is to point at it. Select an
element in the live preview, say what you want, and your instruction travels
with that exact element, so WPOS knows precisely what "this" means.
## Select an element
In the chat box of the [Command Center](/operate/command-center), click
**Inspect element**. Click it again (**Disable inspector**) to turn it off.
In the preview, click the heading, button, card, image, or section you want
to change. It gets a numbered pin on the page and appears as a pill in the
chat box, attached to your next message. You can keep clicking to select
**up to 5 elements** for one message.
Type what you want in plain language and send it, for example:
```text theme={null}
Make this heading larger and add a little space below it.
```
## Select up to 5 elements at once
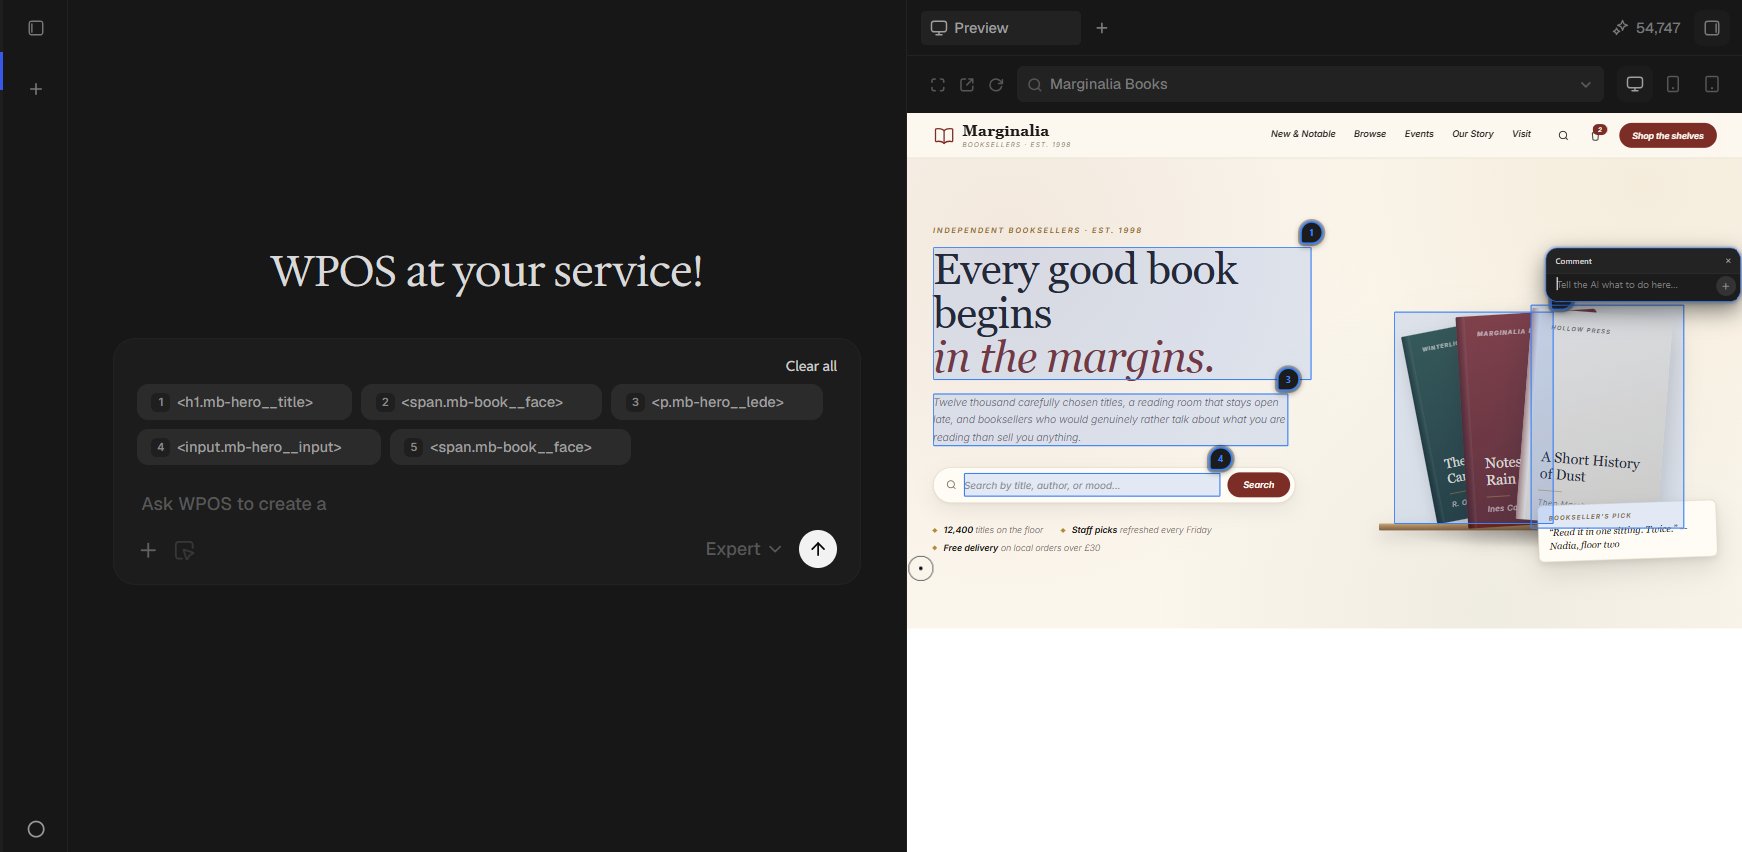
One message can carry **up to 5 selected elements**, for example two buttons
that should line up, or three cards that should match.
* **Numbered pins.** Each element you select gets a pin on the page, numbered
1 to 5 in the order you picked them, so you can refer to them in your
message: "make 2 match 1".
* **Click again to deselect.** Clicking a selected element again removes it
from the selection.
* **A note per element.** Click a pin to open its **Comment** box and tell WPOS
what to do with that element alone, then use **Add to chat**. **Remove this
element** drops it from the selection.
* **Selection full.** After 5, WPOS will not select any more: the preview stops
highlighting other elements, and **Inspect element** says the selection is
full. Remove one to pick another.
In the chat box, each pill shows its number and the element's tag and class,
for example ``. Remove a single pill to swap that element
for another, or click **Clear all** to start again.
```text theme={null}
Give 1 and 2 the same height, and style 3 like 1.
```
## What WPOS does with your selection
* **Finds the source.** WPOS traces the element back to the widget and the
style rule behind it, and makes the change there, instead of patching the
page on top.
* **Checks the result.** It looks at the live page after the change to confirm
it landed before it reports back.
* **Tells you what it found.** If something gets in the way, such as a
conflict with another rule, it says so plainly rather than hiding it.
If the result is not quite right, reply in the same chat. The element stays in
context, so "a little smaller" is enough.
Select first, then ask. "Make the header bigger" without a selection leaves
WPOS guessing which header you mean. With the element selected, the same
sentence lands exactly where you intended.
The chat and live preview where you select and edit.
Speak your request instead of typing it.
 * **Numbered pins.** Each element you select gets a pin on the page, numbered
1 to 5 in the order you picked them, so you can refer to them in your
message: "make 2 match 1".
* **Click again to deselect.** Clicking a selected element again removes it
from the selection.
* **A note per element.** Click a pin to open its **Comment** box and tell WPOS
what to do with that element alone, then use **Add to chat**. **Remove this
element** drops it from the selection.
* **Selection full.** After 5, WPOS will not select any more: the preview stops
highlighting other elements, and **Inspect element** says the selection is
full. Remove one to pick another.
In the chat box, each pill shows its number and the element's tag and class,
for example `
* **Numbered pins.** Each element you select gets a pin on the page, numbered
1 to 5 in the order you picked them, so you can refer to them in your
message: "make 2 match 1".
* **Click again to deselect.** Clicking a selected element again removes it
from the selection.
* **A note per element.** Click a pin to open its **Comment** box and tell WPOS
what to do with that element alone, then use **Add to chat**. **Remove this
element** drops it from the selection.
* **Selection full.** After 5, WPOS will not select any more: the preview stops
highlighting other elements, and **Inspect element** says the selection is
full. Remove one to pick another.
In the chat box, each pill shows its number and the element's tag and class,
for example `